To take a correctly exposed photograph (i.e. not too dark and not too bright), a camera uses a combination of “aperture” and “shutter speed” to determine how much light hits the sensor, “aperture” being the size of the hole in the lens (the bigger the hole, the more light gets in, and vice versa) and “shutter speed” being the length of time the sensor is exposed for (the slower the shutter the more light gets in, and vice versa).
On a bright sunny day you might need a narrower aperture and / or faster shutter speed to limit the light hitting the sensor. On a cloudy day, or indoors with less light, you might need a wider aperture or slower shutter speed to ensure enough light hits the sensor.
Often this mechanism is referred to as the “Exposure Triangle“, with aperture being one side of the triangle and shutter speed being another. But, I hear you say, doesn’t a triangle have three sides?
Yes it does, and the third side is called “ISO“, which is generally described as the sensitivity of the sensor. However this is mis-leading, the sensor only has one sensitivity, what ISO (in a digital camera) does is electronically brighten an image if otherwise the result would be under-exposed (too dark). However, doing so adds “noise” to the image, which appears as a “grain” covering the image if the ISO is set too high. It is therefore desirable to keep the ISO as low as possible to get a better quality image.
Once upon a time, when cameras used film, ISO was built into the film itself, and therefore pre-determined as soon as the film was loaded into the camera, so you could only affect exposure by setting the aperture and shutter speed. In modern digital cameras ISO can be adjusted with a flick of a switch, so it can be used in a similar way to aperture and shutter speed, and that’s why the exposure “triangle” is a triangle, as opposed to a, whatever it is two-sided things are called!
This image is how the exposure triangle is often visualised:-
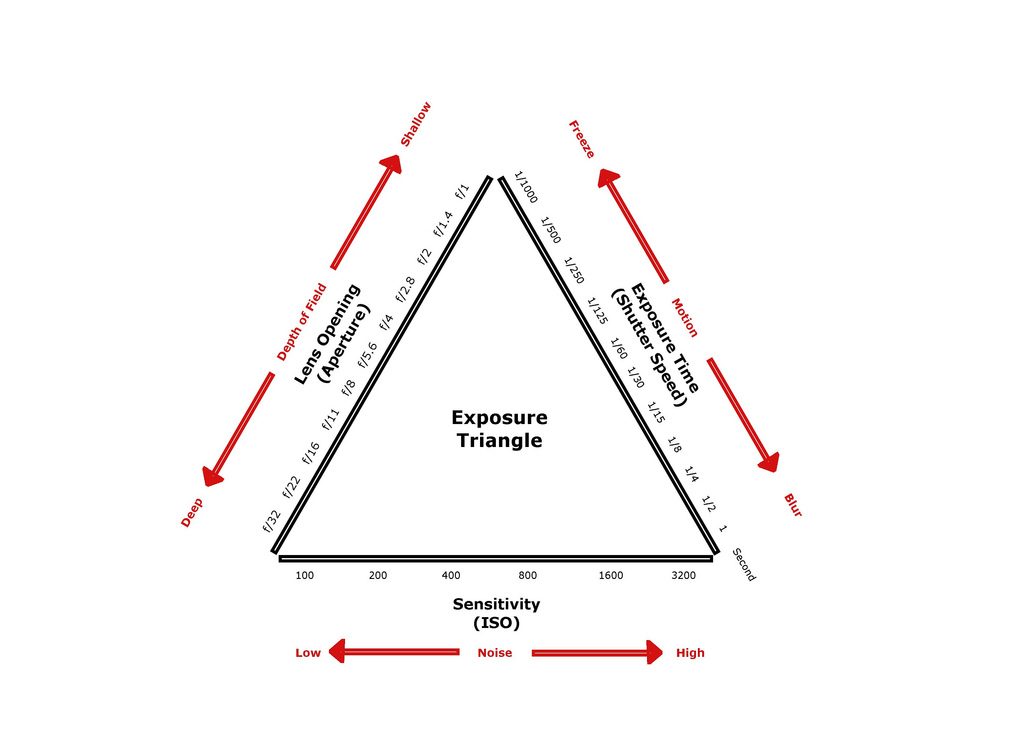
These three settings are related, whereby changing one of them requires changing one or both of the others to compensate for any given exposure (i.e. keeping the triangle triangular!).
The amount by which settings are changed is referred to as a “stop”. Changing the aperture from f/8 to f/11, for example, is to reduce the aperture by a “stop”. Increasing the shutter speed from 1/100th of a second to 1/200th of a second is increasing the shutter speed by a “stop”. So when you change one element by a “stop”, you would need to change one of the others by a “stop” as well to give the same exposure. Understanding exposure is therefore all about understanding the concept of “stops”.
Typical apertures, which are all one stop apart, are:-
f2.8, f/4, f/5.6, f/8, f/11, f/16, f/22
Typical shutter speeds, which are all one stop apart are:-
1/30th – 1/60th – 1/125th – 1/250th – 1/500th – 1/1000th – 1/2000th – 1/4000th
Typical ISO values, which are all one stop apart, are:-
100, 200, 400, 800, 1600, 3200, 6400, 12800
On my camera, shutter speed 1/4000th and ISO12800 is as fast as it goes, higher spec’ed cameras may go further, and what apertures are available is determined by the lens used.
You should be able to glean from the above that shutter speed and ISO are easy to calculate, as one “stop” is half or double the next “stop”, ISO200 is double ISO100, and half ISO400 etc.
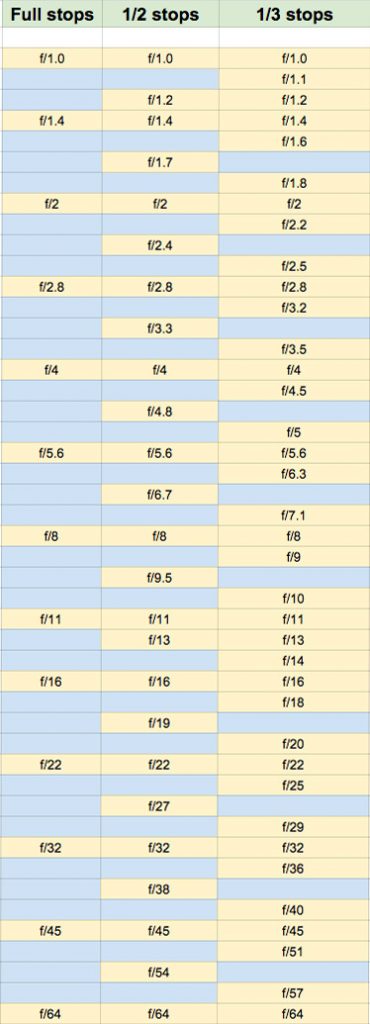
Aperture is where it gets a bit confusing. Not only does the number get smaller when increasing the aperture but it also changes by half the amount you’d expect. f/8 is in fact two “stops” from f/16, despite “8” being half “16”. f/11 is one stop from f/16.
This chart shows the relationship between aperture and stops of light:-
Also, what apertures are available to you are limited by the lens. Most “consumer” lenses don’t go any wider than f/4, and most variable focal length (zoom) lenses have a variable aperture as well, meaning the maximum aperture is different at one end of the zoom range compared to the other. Commonly a consumer zoom lens will be f/4 at the short end and f/5.6 at the long end.
Let’s look at a couple of examples:-
Suppose you’re taking a picture of a landscape, and it’s not a bright sunny day. You determine that you need an aperture of f/16 to get everything in focus (narrower aperture = wider depth of field = more in focus), but at 1/100th shutter speed and ISO100 the image would be too dark. You would need to increase the ISO or reduce the shutter speed. If you’re a landscape photographer you might have your camera on a tripod, and so be able to use a slower shutter speed (the slower the shutter the more chance the image will be blurred), but if not you would have to increase the ISO.
Suppose you’re taking a picture of a bird in flight, it’s moving fast so a fast shutter speed is essential, 1/100th is not fast enough. You determine you need a shutter speed of 1/1600th, that’s four stops faster than 1/100th. To compensate you might increase your aperture by four stops (if f/16 was your starting point that means increase to f/4). If you can’t, because your lens doesn’t go that wide or you just don’t want an aperture that wide, you would need to increase the ISO. If ISO100 was your starting point you might increase by four stops to ISO1600. Or you could go somewhere in the middle, increase your aperture to f/8 (two stops wider) and your ISO to 800 (two stops higher).
The key to remember is a change in one variable has to match a corresponding change in one or both of the other two variables combined.
Two stops aperture adjustment = either two stops shutter, or two stops ISO, or one stop shutter + one stop ISO. Three stops shutter = three stops aperture, or three stops ISO, or two stops aperture + one stop ISO, or two stops ISO + one stop aperture, and so on.
As you can see, the possibilities are endless, giving you much more control over the nature of the images you can capture.
But remember, the triangle isn’t really a triangle!
It’s important to remember that although all three sides of the triangle are equally adjustable, you should work on the assumption that, like people, some are more equal than others! In reality you should use shutter speed and aperture to set the exposure, and only adjust ISO upwards from 100 if you have to.
For example, suppose a shutter speed of 1/1000th, an aperture of f/16, and an ISO of 12800 gives you a correct exposure. Whilst technically correct you wouldn’t call this a “good” exposure. A better exposure, letting in exactly the same amount of light, might be a shutter speed of 1/125th (3 stops slower), an aperture of f/5.6 (3 stops wider) and an ISO of 200 (6 stops lower).
So whilst modern cameras may let you take pictures at very fast shutter speeds and very narrow apertures, and very high ISO’s, that doesn’t mean you can set them to anything you like as long as the exposure is correct. There’s a difference between a correct exposure and a good exposure, and good generally means low ISO, so adjust the other two sides of the triangle first!