This is one of those occasions where different photographers will have different opinions about what modes to use in which scenarios, so this is my take on the subject rather than a definitive guide. Also, everything written here is from the perspective of my Nikon camera (other makes use different terminology).
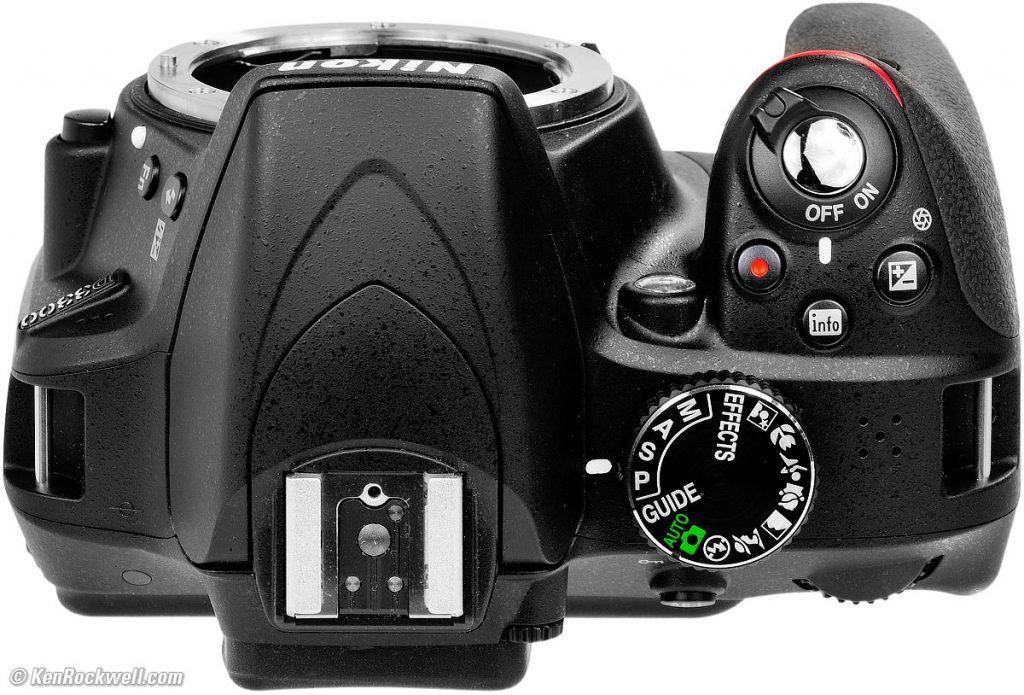
On my camera modes are selected via the dial on the top. This is an image of a Nikon D3300 (my camera) borrowed from Ken Rockwell’s excellent website (http://www.kenrockwell.com/). Ken Rockwell’s site is interesting because he discusses this very subject and has a different take on what modes you should use and when.
Auto
In Auto mode the camera makes all the decisions, it decides shutter speed, aperture, and ISO, and for the most part does a pretty good job of it. I would advise not to be afraid of using Auto or feel it’s some kind of cop out, cameras are very intelligent devices, why make work for yourself if the camera can do it for you, and do it very well.
Personally I use Auto when I’m out and about taking snapshots and don’t care too much what any of the three exposure variables are, knowing the camera will take the best picture it can in the circumstances.
(P) Program
In Program mode the camera offers a range of shutter speed / aperture combinations you can select with the command dial, all of which will give correct exposure, thereby giving you some control over the key variables. Ken Rockwell says he uses this all the time. I never use it. The combinations provided may all give a “correct” exposure but in my opinion if you already know what shutter speed / aperture you wanted you’d use one of the other modes to select them, and if you didn’t you’d use Auto to save having to select either.
(S) Shutter Priority
In Shutter priority mode the command dial selects the shutter speed and the camera decides the aperture and ISO. This mode is generally used for sports photography or when taking pictures of fast moving objects where you want to freeze the action and need a faster shutter speed than the camera would otherwise select, or perhaps the opposite where you want to blur the image and use a slower shutter speed than the camera would otherwise select.
In general the camera will use the widest aperture it can to get the correct exposure, and when the widest available (depending on lens being used) isn’t wide enough it’ll increase the ISO. This is generally what you’d want to happen anyway, so it’s a good overall mode for when you care about getting sharp images of fast moving things, or not as the case may be.
(A) Aperture Priority
In Aperture priority mode the command dial selects the aperture and the camera decides shutter speed and ISO. This mode is generally used when you care about depth of field. A wide aperture gives a shallow depth of field, a narrow aperture gives a wide depth of field. Controlling the aperture means controlling how much of the image is in focus.
For landscapes you would generally use a narrow aperture (perhaps f/11 or upwards if you can), because you’d probably want all of the image in focus. For portraits you’d use a wide aperture (as low as your lens will go) to isolate the subject (person) from the background.
What apertures are available to you depends on the lens, and going too narrow, and thereby letting in too little light, might mean the camera reduces shutter speed too low to get a sharp picture, or increases the ISO too high to get a good quality picture. On my camera, and most I assume, there is an option to set auto-ISO, to stop it going too low on the shutter speed and / or too high on the ISO.
(M) Manual
Manual mode is generally taken to mean setting everything manually, and some photographers might claim this is exactly what they do because they know what settings to use for a correct exposure without any help from the camera. As such this mode can be daunting and the new / inexperienced photographer might decide to keep away from it at first.
I use this mode a fair bit and am anything but an experienced, skilled photographer!
The trick here, for me, is to switch on auto-ISO. This way Manual mode is really a semi-automatic mode which effectively combines Shutter Priority and Aperture Priority. On my camera, in Manual mode, the rear command dial sets shutter speed, and pressing the exposure compensation button on top whilst spinning the command dial sets aperture. I find this easy to do with forefinger and thumb without taking my eye from the viewfinder.
Of course if you want Manual mode to really mean setting everything yourself make sure to switch auto-ISO off!
A word of warning!
Setting everything yourself, or even setting two of the variables and letting the camera decide the other, can lead to under or over exposed images. Even auto-ISO isn’t going to help you if the camera needs to reduce ISO from it’s lowest available setting, or increase it above it’s highest available to get a correct exposure. Using this mode therefore requires some care, in particular you should spend a few moments initially making sure your settings are in the right ball-park before you start shooting a ton of images!
Another word of warning!
Just because you can set shutter speed and aperture in Manual mode, doesn’t mean you should pick whatever values you want, even if doing so wouldn’t go beyond the ISO limits of your camera. It’s always desirable to achieve the lowest ISO you can as high ISO = high noise / graining of the image. You should therefore pay attention to what ISO value the camera is intending to use before taking the shot, and adjust your shutter speed / aperture accordingly to keep it low if possible.
For this reason I tend to use Manual mode only when I know I have some latitude with shutter speed and aperture (because it’s a bright sunny day and I can get away with it, perhaps). If the light is not good, start with the slowest shutter speed you can imagine you’ll get away with and the widest aperture, and adjust from there.
When to use which mode
This is a set of pictures I took at the Autosports Show 2018:-
https://www.flickr.com/photos/150270402@N06/albums/72157664750301298
For these I used Aperture Priority mode, because I wanted to control the depth of field and compensate for the bright lights and dark shadows cast by the artificial lighting in the indoor exhibition centre at which this event was held.
This is a set of pictures I took at Snetterton :-
https://www.flickr.com/photos/150270402@N06/albums/72157689701479162
These were taken using Shutter Priority because the main intention was to either freeze the action or set a shutter speed to a specific value in an attempt to inject motion into the image.
If I feel I need more control, say I’m shooting a fast moving subject but I specifically want a large depth of field to get more of the image in focus, and conditions allow, I might use Manual mode.
In general I stay away from Program Mode because although the settings it chooses might all result in a correct exposure only I know what I’m trying to achieve, and if I know that I should know what shutter speed / aperture I need and one of the other modes could be more appropriate.
At the end of the day the mode you choose is based on the attribute(s) you consider most important, and that should be fairly obvious, but either way go with whatever you feel comfortable with and which gets you the results you desire. Don’t feel not using Manual means you’re not a good photographer, and don’t be afraid of letting the camera help you out. You didn’t spend £100’s or £1,000’s on a camera to then do all the work yourself. 🙂